Ontario : azure devops plugins - Кабринский Эдуард
Posted: 11 May 2021, 07:02
Кабринский Эдуард - Devops integration - Eduard Kabrinskiy
<h1>Devops integration</h1>
<p>[youtube]</p>
Devops integration <a href="http://remmont.com">New newspaper</a> Devops integration
<h1>The Blog</h1>
<p>Manoosh March 31, 2020 Uncategorized </p>
<p style="clear: both"><img src="https://www.idalko.com/wp-content/uploa ... 46x423.jpg" /></p>
<p>Many companies seek the right software integration solution to sync data in a flexible manner in order to seamlessly collaborate with one another. Let’s say your team is working in Jira while your customer or a partner is working in Azure DevOps. The need for a Jira Azure DevOps integration becomes obvious when both sides need to work in their own environment. Such an integration helps teams to manage their data according to their roles and needs.</p>
<p>In this guide, we’ll discuss the need to integrate Jira and Azure DevOps and how to share information between the two. We’ll show you how this integration is set up to keep teams and projects in sync. Once you’ve set it up, it will do the heavy lifting for you, leaving your teams free to focus on their work.</p>
<p><em>Note: In this tutorial, we will be using a software integration tool called</em> <em>Exalate</em> <em>to set up the integration. You will learn more about this throughout this guide.</em></p>
<p>Here is an overview of what we’re going to cover:</p>
<h2>Why Integrate Jira and Azure DevOps?</h2>
<h3>What is Jira?</h3>
<p>Jira is an issue tracking and project management platform. It is popular with developers and a good fit for teams using an agile methodology. You can use it to assign tasks and manage bugs.</p>
<p>It comes in two main versions. We’re looking at the cloud-hosted version here, but you can also self-host if you prefer. If you’re running an open-source project, Jira is free, making it a particularly good choice.</p>
<p>As well as being highly customizable, Jira has a range of extensions available on the Atlassian Marketplace. These let you extend its functionality. We’ll be taking advantage of that capability to set up our integration with Azure DevOps.</p>
<h3>What is Azure DevOps?</h3>
<p>Azure DevOps is a system that lets you keep track of your code and manage projects. It handles code versioning and has features for testing, builds automation, and releases management.</p>
<p>Like Jira, it is popular with developers and integrates well with Visual Studio, Microsoft’s popular development environment, as well as Eclipse.</p>
<p>It also has something in common with Jira, and that’s its two versions. You can use it on the cloud, or host it on your own server. It has a marketplace full of extensions, letting you expand what it can do.</p>
<h3>Why Integrate Azure DevOps and Jira?</h3>
<p>Both platforms have different strengths, useful for teams in various roles. A company might have a backend team working in Azure DevOps, and a frontend team using Jira, for example. Alternatively, you may be using one system for developers and one for customer support.</p>
<p>The biggest advantage of such an integration is that the teams have the freedom to set up their own platforms however they want. They will be working in their own environment and won’t need to worry about their security or autonomy to be lost in the process.</p>
<p>However, there are some problems with this approach as well. If you don’t keep an eye on things, teams can become siloed. The information they store can be duplicated or inaccurate. Fortunately, there are tools that can help with this cross-team collaboration.</p>
<h2>How to Choose the Right Technology for Setting up your Azure DevOps Jira Integration</h2>
<p>Working across different platforms can bring some challenges with itself. If you can meet those challenges, you’ll be able to work more efficiently and consequently, you’ll be more productive.</p>
<p>There are three things you need to think about when choosing a tool. These are as follows.</p>
<h3>Reliability</h3>
<p>Once you’ve set the integration up, you want it to work in the background without any fuss. The solution should also be able to deal with downtime to one, or both platforms and be able to get everything back in sync once they are both back online.</p>
<p>A reliable tool lets your teams get on with what they do and doesn’t need anyone to spend time managing it.</p>
<h3>Flexibility</h3>
<p>Your teams will have different roles in your organization. A compatible system has to bridge the gap between them and share only the data that either side needs. The transferred data has to be filtered so that everybody shares what they need to, and sees what matters to them.</p>
<p>Your workflows will likely change and evolve. Your integration solution needs to be able to handle that. As well as being able to adjust the data used by your existing platforms, it should allow you to work with other platforms and connect them together just as easily.</p>
<h3>Autonomy</h3>
<p>The solution should allow the teams to work independently. As well as work according to defined workflows, they should be able to change those workflows without having to coordinate with other teams.</p>
<p>An integration solution should be able to manage this kind of change and let teams make adjustments without being dependent on the other end. If teams want to use additional information or change the data structure, this should be possible without the whole system needing to be changed.</p>
<p>Because of the above requirements, we have chosen a solution for this guide which is called Exalate.</p>
<p>Now that we’ve selected a tool, let’s look at how it can be used. We’ll show you how to set it up with Jira and AzureDevOps and to get the platforms to share information automatically.</p>
<h2>How to Set up a Jira Azure DevOps Integration (a Step by Step Process)</h2>
<p>To set up our integration, there are three main steps to follow. First, we install Exalate on Jira, then we do the same for Azure DevOps. And finally, we set up a connection between the two. We’ll also look at how to control what information is shared, and what triggers data exchange.</p>
<h3>Step 1: Install Exalate on Jira</h3>
<p>We’ll start by setting up Exalate in Jira. For more information, check this link. If you’re running Jira on your own server instead of the cloud, click here instead.</p>
<p>First, we need to find and install Exalate. To do that, click the Jira administration settings button and choose add-ons from the drop-down menu. On the left-hand menu, select “Find New Apps”.</p>
<p>Type “Exalate” in the search box and press enter. You’ll see multiple apps listed. Select the “Exalate Jira Issue Sync & more” option.</p>
<p style="clear: both"><img src="https://www.idalko.com/wp-content/uploa ... age-74.png" /></p>
<p>Click on the “Free Trial” button. This will take you to MyAtlassian, so click the button on the popup to confirm this. Log in here, if you haven’t already, then agree to the terms and conditions and click “Generate License”.</p>
<p style="clear: both"><img src="https://www.idalko.com/wp-content/uploa ... age-75.png" /></p>
<p>Next, your license will be generated. You’ll see a pop-up that lets you apply the license to your Jira instance. Confirm the details are correct and click “Apply License” to continue.</p>
<p style="clear: both"><img src="https://www.idalko.com/wp-content/uploa ... age-76.png" /></p>
<p>You’ll then be redirected back to your Jira page. A pop-up will appear confirming Exalate is licensed.</p>
<p style="clear: both"><img src="https://www.idalko.com/wp-content/uploa ... age-77.png" /></p>
<p>Click “Get started” to complete the installation. We’re now ready to go on to Jira, but before we can connect our platforms, we need to set up Azure DevOps, too.</p>
<h3>Step 2: Install Exalate on Azure DevOps</h3>
<p>As with Jira, we need to install Exalate on Azure DevOps before connecting the platforms. For an overview of installation and configuration, please read this guide . And you can find more information here .</p>
<p>There are several ways to install Exalate. If you’re running Azure DevOps on your own server, you can install it via docker, in which case read this guide . You can also get it from the Visual Studio Marketplace .</p>
<p>We’ll go through the steps on installing it from the marketplace. Make sure you are logged in to Azure DevOps with admin privileges.</p>
<p>Click the icon at the bottom left of the screen saying вЂOrganization settings’. Then click вЂExtensions’ in the left-hand menu, under the вЂGeneral’ heading.</p>
<p style="clear: both"><img src="https://www.idalko.com/wp-content/uploads/2020/03/1.png" /></p>
<p>You’ll see a list of installed extensions, if you have any, or a message telling you that you don’t. Next, click the вЂBrowse Marketplace’ button.</p>
<p style="clear: both"><img src="https://www.idalko.com/wp-content/uploads/2020/03/2.png" /></p>
<p>You’ll be taken to the Visual Studio Marketplace. Click in the search field at the top and search for вЂExalate for Azure DevOps’.</p>
<p style="clear: both"><img src="https://www.idalko.com/wp-content/uploads/2020/03/3.jpg" /></p>
<p>Click on the app’s icon. On the app page itself, click the green вЂGet’ button.</p>
<p style="clear: both"><img src="https://www.idalko.com/wp-content/uploads/2020/03/4.jpg" /></p>
<p>You’ll next see a screen when you have to pick the organization that your installation will work with. Choose one from the drop-down list and then click вЂInstall’.</p>
<p style="clear: both"><img src="https://www.idalko.com/wp-content/uploads/2020/03/5.png" /></p>
<p>After that, Exalate is ready for use on Azure DevOps.</p>
<h3>Step 3: Connect Azure DevOps and Jira</h3>
<p>Now that we’ve installed Exalate on both platforms, we need to create a connection. We do that by generating an invitation code on one platform and passing it on to the other.</p>
<p>Look at the settings page on Azure DevOps in the above screenshot. You’ll see there’s a “connections” item in the left-hand menu. Click that now.</p>
<p style="clear: both"><img src="https://www.idalko.com/wp-content/uploa ... age-87.png" /></p>
<p>Next click the green “initiate connection” button in the top right.</p>
<p style="clear: both"><img src="https://www.idalko.com/wp-content/uploa ... age-88.png" /></p>
<p>Then we choose our connection type. For now, leave it as default: “another instance which is accessible”. Click the green “next” button.</p>
<p style="clear: both"><img src="https://www.idalko.com/wp-content/uploa ... age-89.png" /></p>
<p>Next, enter the URL of the Jira instance used in step one. When you’re done, click “Next” again.</p>
<p style="clear: both"><img src="https://www.idalko.com/wp-content/uploa ... age-90.png" /></p>
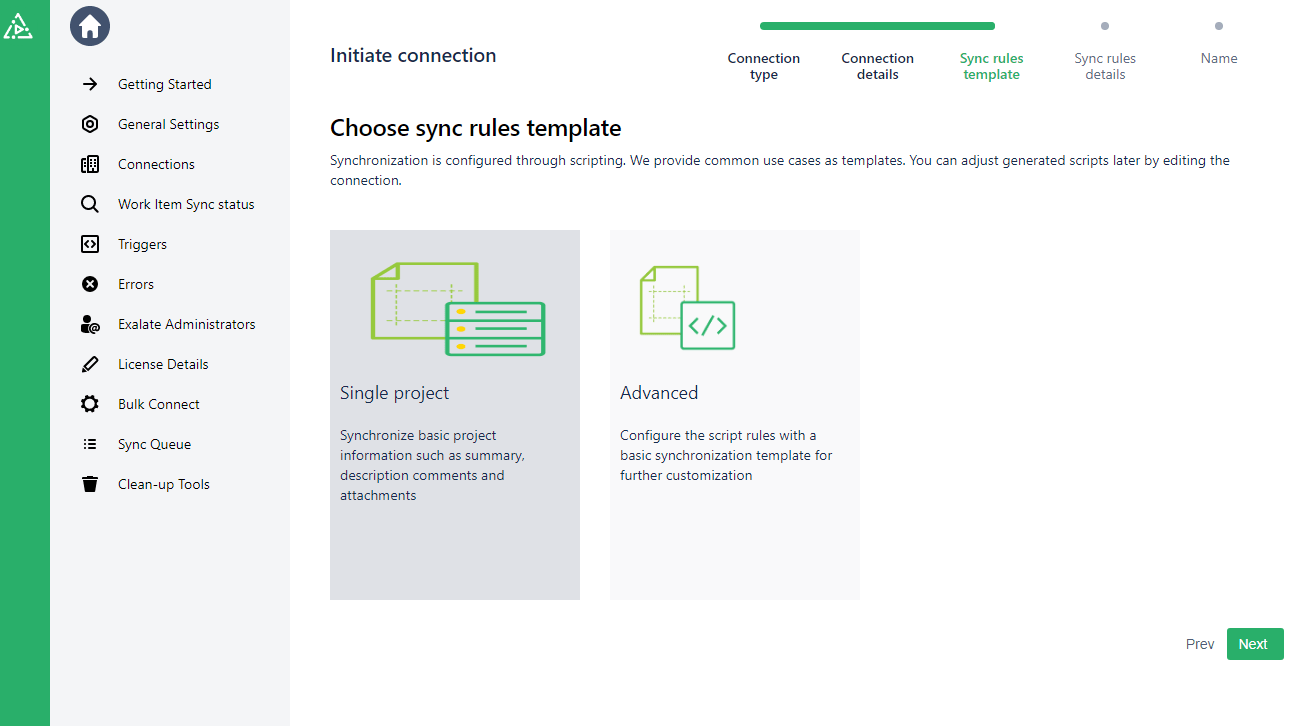
<p>On the next screen, you can pick whether to sync basic project information, or whether to use a synchronization template. For now, leave the default “single project”, and click “next” again.</p>
<p style="clear: both"><img src="https://www.idalko.com/wp-content/uploa ... age-91.png" /></p>
<p>On the next screen, pick the project you want to synchronize from the drop-down list, then click “Next” again.</p>
<p style="clear: both"><img src="https://www.idalko.com/wp-content/uploa ... age-92.png" /></p>
<p>Finally, give the new connection a name and, optionally, add a description. Doing this will help you identify it later. Leave the “active” button ticked. Then click the green “Initiate Connection” button to create the connection.</p>
<p style="clear: both"><img src="https://www.idalko.com/wp-content/uploa ... age-93.png" /></p>
<p>Now, Exalate has generated an invitation code. Copy this and save it somewhere. We’re done with Azure DevOps for now, but we need to enter our code into Jira as well. So let’s head back there.</p>
<p style="clear: both"><img src="https://www.idalko.com/wp-content/uploa ... age-94.png" /></p>
<p>Look in the “Add-ons” section in Jira, then click “Connections” from the Exalate section in the left-hand menu. Click the “Accept Invitation” button.</p>
<p style="clear: both"><img src="https://www.idalko.com/wp-content/uploa ... age-95.png" /></p>
<p>On the next screen, you’ll see a space where you need to enter your invite code. Copy the one generated earlier, and paste it in here. Then click “next”.</p>
<p style="clear: both"><img src="https://www.idalko.com/wp-content/uploa ... age-96.png" /></p>
<p>As when creating the connection in Azure DevOps, you can choose a sync rules template. For now, just click “next”.</p>
<p style="clear: both"><img src="https://www.idalko.com/wp-content/uploa ... age-97.png" /></p>
<p>On the next screen, choose the project to work with from the drop-down menu. Then click “confirm” to create the connection on the Jira side. After a brief wait, we should now see our connection listed as in the image below:</p>
<p style="clear: both"><img src="https://www.idalko.com/wp-content/uploa ... age-98.png" /></p>
<h3>Step 4: Configure your Connection to Determine What Information Gets Shared</h3>
<p>Let’s configure the connection now to make sure it shares what we want. Look in the action column on the right. Click the three dots next to your connection, and click “edit”.</p>
<p style="clear: both"><img src="https://www.idalko.com/wp-content/uploa ... age-99.png" /></p>
<p>Click the “Sync Rules” tab on the next screen. This screen will show you what data is shared between the platforms.</p>
<p style="clear: both"><img src="https://www.idalko.com/wp-content/uploa ... ge-100.png" /></p>
<p>The sync rules show how the information stored in one system is matched to that on another. These will usually match correctly, but it is worth checking to ensure that is the case. If you have any custom fields or unusually named items, it’s especially important to check this.</p>
<p>You can also customize it however you like. Maybe you want some information to be listed as comments so you can browse through it easily. It’s up to you.</p>
<p>Look where it says “replica.assignee = issue.assignee” for example. That matches the assignee fields on both platforms. You might want a specific team member to deal with information shared with your other teams though. In that case, you can add the person’s name here to give them the authority to override the shared information.</p>
<p>You can delete any lines you don’t want to be synced, and also change anything you want to be sent to a different field.</p>
<p>Adding and deleting lines is straightforward. Changing field names is also simple. Just change the text after the dot. If you understand code, you can do more and set specific conditions for when things are shared.</p>
<p>Take a look at our script helpers guide for more information on what you can do.</p>
<h3>Step 5: Set up Automated Synchronization Triggers</h3>
<p>Our platforms are now connected and we have chosen what information to be shared. Next, we need to select what will trigger the sharing of that information. For more detail on how you can customize what is exchanged and how it is done, please read this.</p>
<p style="clear: both"><img src="https://www.idalko.com/wp-content/uploa ... ge-101.png" /></p>
<p>In, Jira, click “Triggers” in the left-hand Exalate menu. Then click the green “Create Trigger” button.</p>
<p style="clear: both"><img src="https://www.idalko.com/wp-content/uploa ... ge-102.png" /></p>
<p>On the “Create Trigger” screen, we can enter a JQL query that lets us choose when and how issues are synced.</p>
<p>JQL might sound intimidating, but a pop-up guide will appear as you type, showing you what commands are available. It is intuitive and powerful. Give it a try!</p>
<p style="clear: both"><img src="https://www.idalko.com/wp-content/uploa ... ge-103.png" /></p>
<p>Once you’ve done this, choose the connection to sync with from the drop-down box, and enter any notes. The notes are especially useful for keeping track of multiple connections with different purposes.</p>
<p>There’s also an “Active” switch to turn the trigger on and off, so don’t forget to activate that if you want the trigger to work. When you’re done, click the “create” button. Your newly created trigger will share information according to the conditions you have set.</p>
<h2>Common Pitfalls to Keep in Mind When Completing the Integration Between Azure DevOps and Jira</h2>
<p>When setting up your integration between Jira and Azure DevOps, there are some things to look out for. Being aware of these issues will help keep your teams happy and make your changes successful.</p>
<h3>Role Clarification</h3>
<p>When integrating tools, don’t forget to use them for what they’re good at. Jira is best at issue tracking. Azure DevOps is better for teams using a DevOps toolchain.</p>
<h3>Too Many Messages</h3>
<p>Most platforms send notification messages when certain things happen. This could be when a ticket is created, or when someone leaves a comment. Your integration means this information is shared automatically, which is great. What’s not great is when everybody’s in-tray fills up with unwanted messages. Make sure you tune your notification settings to avoid swamping people with emails.</p>
<h3>Validation Errors</h3>
<p>If you see a validation error when putting your credentials into your Exalate node, try waiting for a while. It may take time for the servers to propagate.</p>
<h2>Architecture, Security, and Deployment for a Jira Azure DevOps Integration</h2>
<p>Alright let’s now discuss Exalate technology in more detail. If you’re using it, you may be curious about its architecture and the security features it has.</p>
<h3>Architectural Autonomy</h3>
<p>This diagram shows Exalate’s architecture:</p>
<p style="clear: both"><img src="https://www.idalko.com/wp-content/uploa ... s-Jira.png" /></p>
<p>The blue end represents Azure DevOps and the red end represents Jira. Exalate agents for each platform sit in between these two services and handle the exchange of information between them.</p>
<p><ul>
<li>The letters A-F show how information flows between platforms. Both services use Exalate as an intermediary, which maintains the autonomy of each one.</li>
</ul>
<ul>
<li>The Exalate agents control what gets sent and how information is matched from one platform to the other.</li>
</ul>
<ul>
<li>As well as Azure DevOps and Jira (Cloud and on-premise), there are Exalate agents available for GitHub, ServiceNow, HP ALM/QC, and Zendesk. More services will be added soon, so check back later if the one you need isn’t ready yet. You can also request an integration.</li>
</ul>
</p>
<h3>Security</h3>
<p>Security is definitely a key consideration when exchanging information between platforms. Exalate is designed with security in mind so you can trust it to synchronize information securely.</p>
<p>It uses the secure https protocol for most data exchange and nodes use a reverse proxy for data termination. It also uses JWT to ensure data requests come from trusted sources.</p>
<p>Exalate protects your data by taking daily backups, which are retained for two days. It also conducts monthly penetration tests to help find and eliminate potential security issues.</p>
<p>To learn more about how Exalate keeps data safe, read this free Exalate Security and Architecture Whitepaper</p>
<p style="clear: both"><img src="https://www.idalko.com/wp-content/uploa ... labels.png" /></p>
<p>This image shows the relationship between Exalate and the services it supports.</p>
<h2>Conclusion</h2>
<p>Using issue trackers and online services is a core part of many businesses, and linking them effectively can be key to ensuring your teams work together efficiently. Being able to join the dots in your organization will save you time and money.</p>
<p>Platforms like Azure DevOps and Jira all have their pros and cons, and working with both of them together can cause headaches. The right software integration solution can let you take advantage of their strengths while dodging the pitfalls that can harm your productivity.</p>
<p>It gives you the reliability of an automated tool, as well as flexibility, letting your teams customize their own workflows. They can work independently, but without the information they store being locked away from other teams. This means you can pick the right platforms for each part of your business, without having to worry about how they connect together. Let the software do the hard work for you.</p>
<p>That’s it for now. In this guide, we’ve set up the integration using Exalate. And we’ve described the step-by-step process on how to complete this integration to bridge the gap between systems, different teams, and companies.</p>
<p>If you’re interested in learning more about software integration, you can download this ebook and read all about an effective cross-company integration. You might also want to find out more about aligning ServiceDesk and development teams in this blueprint.</p>
<p><strong><em>Recommended reads:</em></strong></p>
<p><strong>SUBSCRIBE TO OUR NEWSLETTER</strong></p>
<h2>Devops integration</h2>
<h3>Devops integration</h3>
<p>[youtube]</p>
Devops integration <a href="http://remmont.com">Latest news headlines</a> Devops integration
<h4>Devops integration</h4>
The Blog Manoosh March 31, 2020 Uncategorized Many companies seek the right software integration solution to sync data in a flexible manner in order to seamlessly collaborate with one
<h5>Devops integration</h5>
Devops integration <a href="http://remmont.com">Devops integration</a> Devops integration
SOURCE: <h6>Devops integration</h6> <a href="https://dev-ops.engineer/">Devops integration</a> Devops integration
#tags#[replace: -,-Devops integration] Devops integration#tags#
Eduard Kabrinskiy
current news
<h1>Devops integration</h1>
<p>[youtube]</p>
Devops integration <a href="http://remmont.com">New newspaper</a> Devops integration
<h1>The Blog</h1>
<p>Manoosh March 31, 2020 Uncategorized </p>
<p style="clear: both"><img src="https://www.idalko.com/wp-content/uploa ... 46x423.jpg" /></p>
<p>Many companies seek the right software integration solution to sync data in a flexible manner in order to seamlessly collaborate with one another. Let’s say your team is working in Jira while your customer or a partner is working in Azure DevOps. The need for a Jira Azure DevOps integration becomes obvious when both sides need to work in their own environment. Such an integration helps teams to manage their data according to their roles and needs.</p>
<p>In this guide, we’ll discuss the need to integrate Jira and Azure DevOps and how to share information between the two. We’ll show you how this integration is set up to keep teams and projects in sync. Once you’ve set it up, it will do the heavy lifting for you, leaving your teams free to focus on their work.</p>
<p><em>Note: In this tutorial, we will be using a software integration tool called</em> <em>Exalate</em> <em>to set up the integration. You will learn more about this throughout this guide.</em></p>
<p>Here is an overview of what we’re going to cover:</p>
<h2>Why Integrate Jira and Azure DevOps?</h2>
<h3>What is Jira?</h3>
<p>Jira is an issue tracking and project management platform. It is popular with developers and a good fit for teams using an agile methodology. You can use it to assign tasks and manage bugs.</p>
<p>It comes in two main versions. We’re looking at the cloud-hosted version here, but you can also self-host if you prefer. If you’re running an open-source project, Jira is free, making it a particularly good choice.</p>
<p>As well as being highly customizable, Jira has a range of extensions available on the Atlassian Marketplace. These let you extend its functionality. We’ll be taking advantage of that capability to set up our integration with Azure DevOps.</p>
<h3>What is Azure DevOps?</h3>
<p>Azure DevOps is a system that lets you keep track of your code and manage projects. It handles code versioning and has features for testing, builds automation, and releases management.</p>
<p>Like Jira, it is popular with developers and integrates well with Visual Studio, Microsoft’s popular development environment, as well as Eclipse.</p>
<p>It also has something in common with Jira, and that’s its two versions. You can use it on the cloud, or host it on your own server. It has a marketplace full of extensions, letting you expand what it can do.</p>
<h3>Why Integrate Azure DevOps and Jira?</h3>
<p>Both platforms have different strengths, useful for teams in various roles. A company might have a backend team working in Azure DevOps, and a frontend team using Jira, for example. Alternatively, you may be using one system for developers and one for customer support.</p>
<p>The biggest advantage of such an integration is that the teams have the freedom to set up their own platforms however they want. They will be working in their own environment and won’t need to worry about their security or autonomy to be lost in the process.</p>
<p>However, there are some problems with this approach as well. If you don’t keep an eye on things, teams can become siloed. The information they store can be duplicated or inaccurate. Fortunately, there are tools that can help with this cross-team collaboration.</p>
<h2>How to Choose the Right Technology for Setting up your Azure DevOps Jira Integration</h2>
<p>Working across different platforms can bring some challenges with itself. If you can meet those challenges, you’ll be able to work more efficiently and consequently, you’ll be more productive.</p>
<p>There are three things you need to think about when choosing a tool. These are as follows.</p>
<h3>Reliability</h3>
<p>Once you’ve set the integration up, you want it to work in the background without any fuss. The solution should also be able to deal with downtime to one, or both platforms and be able to get everything back in sync once they are both back online.</p>
<p>A reliable tool lets your teams get on with what they do and doesn’t need anyone to spend time managing it.</p>
<h3>Flexibility</h3>
<p>Your teams will have different roles in your organization. A compatible system has to bridge the gap between them and share only the data that either side needs. The transferred data has to be filtered so that everybody shares what they need to, and sees what matters to them.</p>
<p>Your workflows will likely change and evolve. Your integration solution needs to be able to handle that. As well as being able to adjust the data used by your existing platforms, it should allow you to work with other platforms and connect them together just as easily.</p>
<h3>Autonomy</h3>
<p>The solution should allow the teams to work independently. As well as work according to defined workflows, they should be able to change those workflows without having to coordinate with other teams.</p>
<p>An integration solution should be able to manage this kind of change and let teams make adjustments without being dependent on the other end. If teams want to use additional information or change the data structure, this should be possible without the whole system needing to be changed.</p>
<p>Because of the above requirements, we have chosen a solution for this guide which is called Exalate.</p>
<p>Now that we’ve selected a tool, let’s look at how it can be used. We’ll show you how to set it up with Jira and AzureDevOps and to get the platforms to share information automatically.</p>
<h2>How to Set up a Jira Azure DevOps Integration (a Step by Step Process)</h2>
<p>To set up our integration, there are three main steps to follow. First, we install Exalate on Jira, then we do the same for Azure DevOps. And finally, we set up a connection between the two. We’ll also look at how to control what information is shared, and what triggers data exchange.</p>
<h3>Step 1: Install Exalate on Jira</h3>
<p>We’ll start by setting up Exalate in Jira. For more information, check this link. If you’re running Jira on your own server instead of the cloud, click here instead.</p>
<p>First, we need to find and install Exalate. To do that, click the Jira administration settings button and choose add-ons from the drop-down menu. On the left-hand menu, select “Find New Apps”.</p>
<p>Type “Exalate” in the search box and press enter. You’ll see multiple apps listed. Select the “Exalate Jira Issue Sync & more” option.</p>
<p style="clear: both"><img src="https://www.idalko.com/wp-content/uploa ... age-74.png" /></p>
<p>Click on the “Free Trial” button. This will take you to MyAtlassian, so click the button on the popup to confirm this. Log in here, if you haven’t already, then agree to the terms and conditions and click “Generate License”.</p>
<p style="clear: both"><img src="https://www.idalko.com/wp-content/uploa ... age-75.png" /></p>
<p>Next, your license will be generated. You’ll see a pop-up that lets you apply the license to your Jira instance. Confirm the details are correct and click “Apply License” to continue.</p>
<p style="clear: both"><img src="https://www.idalko.com/wp-content/uploa ... age-76.png" /></p>
<p>You’ll then be redirected back to your Jira page. A pop-up will appear confirming Exalate is licensed.</p>
<p style="clear: both"><img src="https://www.idalko.com/wp-content/uploa ... age-77.png" /></p>
<p>Click “Get started” to complete the installation. We’re now ready to go on to Jira, but before we can connect our platforms, we need to set up Azure DevOps, too.</p>
<h3>Step 2: Install Exalate on Azure DevOps</h3>
<p>As with Jira, we need to install Exalate on Azure DevOps before connecting the platforms. For an overview of installation and configuration, please read this guide . And you can find more information here .</p>
<p>There are several ways to install Exalate. If you’re running Azure DevOps on your own server, you can install it via docker, in which case read this guide . You can also get it from the Visual Studio Marketplace .</p>
<p>We’ll go through the steps on installing it from the marketplace. Make sure you are logged in to Azure DevOps with admin privileges.</p>
<p>Click the icon at the bottom left of the screen saying вЂOrganization settings’. Then click вЂExtensions’ in the left-hand menu, under the вЂGeneral’ heading.</p>
<p style="clear: both"><img src="https://www.idalko.com/wp-content/uploads/2020/03/1.png" /></p>
<p>You’ll see a list of installed extensions, if you have any, or a message telling you that you don’t. Next, click the вЂBrowse Marketplace’ button.</p>
<p style="clear: both"><img src="https://www.idalko.com/wp-content/uploads/2020/03/2.png" /></p>
<p>You’ll be taken to the Visual Studio Marketplace. Click in the search field at the top and search for вЂExalate for Azure DevOps’.</p>
<p style="clear: both"><img src="https://www.idalko.com/wp-content/uploads/2020/03/3.jpg" /></p>
<p>Click on the app’s icon. On the app page itself, click the green вЂGet’ button.</p>
<p style="clear: both"><img src="https://www.idalko.com/wp-content/uploads/2020/03/4.jpg" /></p>
<p>You’ll next see a screen when you have to pick the organization that your installation will work with. Choose one from the drop-down list and then click вЂInstall’.</p>
<p style="clear: both"><img src="https://www.idalko.com/wp-content/uploads/2020/03/5.png" /></p>
<p>After that, Exalate is ready for use on Azure DevOps.</p>
<h3>Step 3: Connect Azure DevOps and Jira</h3>
<p>Now that we’ve installed Exalate on both platforms, we need to create a connection. We do that by generating an invitation code on one platform and passing it on to the other.</p>
<p>Look at the settings page on Azure DevOps in the above screenshot. You’ll see there’s a “connections” item in the left-hand menu. Click that now.</p>
<p style="clear: both"><img src="https://www.idalko.com/wp-content/uploa ... age-87.png" /></p>
<p>Next click the green “initiate connection” button in the top right.</p>
<p style="clear: both"><img src="https://www.idalko.com/wp-content/uploa ... age-88.png" /></p>
<p>Then we choose our connection type. For now, leave it as default: “another instance which is accessible”. Click the green “next” button.</p>
<p style="clear: both"><img src="https://www.idalko.com/wp-content/uploa ... age-89.png" /></p>
<p>Next, enter the URL of the Jira instance used in step one. When you’re done, click “Next” again.</p>
<p style="clear: both"><img src="https://www.idalko.com/wp-content/uploa ... age-90.png" /></p>
<p>On the next screen, you can pick whether to sync basic project information, or whether to use a synchronization template. For now, leave the default “single project”, and click “next” again.</p>
<p style="clear: both"><img src="https://www.idalko.com/wp-content/uploa ... age-91.png" /></p>
<p>On the next screen, pick the project you want to synchronize from the drop-down list, then click “Next” again.</p>
<p style="clear: both"><img src="https://www.idalko.com/wp-content/uploa ... age-92.png" /></p>
<p>Finally, give the new connection a name and, optionally, add a description. Doing this will help you identify it later. Leave the “active” button ticked. Then click the green “Initiate Connection” button to create the connection.</p>
<p style="clear: both"><img src="https://www.idalko.com/wp-content/uploa ... age-93.png" /></p>
<p>Now, Exalate has generated an invitation code. Copy this and save it somewhere. We’re done with Azure DevOps for now, but we need to enter our code into Jira as well. So let’s head back there.</p>
<p style="clear: both"><img src="https://www.idalko.com/wp-content/uploa ... age-94.png" /></p>
<p>Look in the “Add-ons” section in Jira, then click “Connections” from the Exalate section in the left-hand menu. Click the “Accept Invitation” button.</p>
<p style="clear: both"><img src="https://www.idalko.com/wp-content/uploa ... age-95.png" /></p>
<p>On the next screen, you’ll see a space where you need to enter your invite code. Copy the one generated earlier, and paste it in here. Then click “next”.</p>
<p style="clear: both"><img src="https://www.idalko.com/wp-content/uploa ... age-96.png" /></p>
<p>As when creating the connection in Azure DevOps, you can choose a sync rules template. For now, just click “next”.</p>
<p style="clear: both"><img src="https://www.idalko.com/wp-content/uploa ... age-97.png" /></p>
<p>On the next screen, choose the project to work with from the drop-down menu. Then click “confirm” to create the connection on the Jira side. After a brief wait, we should now see our connection listed as in the image below:</p>
<p style="clear: both"><img src="https://www.idalko.com/wp-content/uploa ... age-98.png" /></p>
<h3>Step 4: Configure your Connection to Determine What Information Gets Shared</h3>
<p>Let’s configure the connection now to make sure it shares what we want. Look in the action column on the right. Click the three dots next to your connection, and click “edit”.</p>
<p style="clear: both"><img src="https://www.idalko.com/wp-content/uploa ... age-99.png" /></p>
<p>Click the “Sync Rules” tab on the next screen. This screen will show you what data is shared between the platforms.</p>
<p style="clear: both"><img src="https://www.idalko.com/wp-content/uploa ... ge-100.png" /></p>
<p>The sync rules show how the information stored in one system is matched to that on another. These will usually match correctly, but it is worth checking to ensure that is the case. If you have any custom fields or unusually named items, it’s especially important to check this.</p>
<p>You can also customize it however you like. Maybe you want some information to be listed as comments so you can browse through it easily. It’s up to you.</p>
<p>Look where it says “replica.assignee = issue.assignee” for example. That matches the assignee fields on both platforms. You might want a specific team member to deal with information shared with your other teams though. In that case, you can add the person’s name here to give them the authority to override the shared information.</p>
<p>You can delete any lines you don’t want to be synced, and also change anything you want to be sent to a different field.</p>
<p>Adding and deleting lines is straightforward. Changing field names is also simple. Just change the text after the dot. If you understand code, you can do more and set specific conditions for when things are shared.</p>
<p>Take a look at our script helpers guide for more information on what you can do.</p>
<h3>Step 5: Set up Automated Synchronization Triggers</h3>
<p>Our platforms are now connected and we have chosen what information to be shared. Next, we need to select what will trigger the sharing of that information. For more detail on how you can customize what is exchanged and how it is done, please read this.</p>
<p style="clear: both"><img src="https://www.idalko.com/wp-content/uploa ... ge-101.png" /></p>
<p>In, Jira, click “Triggers” in the left-hand Exalate menu. Then click the green “Create Trigger” button.</p>
<p style="clear: both"><img src="https://www.idalko.com/wp-content/uploa ... ge-102.png" /></p>
<p>On the “Create Trigger” screen, we can enter a JQL query that lets us choose when and how issues are synced.</p>
<p>JQL might sound intimidating, but a pop-up guide will appear as you type, showing you what commands are available. It is intuitive and powerful. Give it a try!</p>
<p style="clear: both"><img src="https://www.idalko.com/wp-content/uploa ... ge-103.png" /></p>
<p>Once you’ve done this, choose the connection to sync with from the drop-down box, and enter any notes. The notes are especially useful for keeping track of multiple connections with different purposes.</p>
<p>There’s also an “Active” switch to turn the trigger on and off, so don’t forget to activate that if you want the trigger to work. When you’re done, click the “create” button. Your newly created trigger will share information according to the conditions you have set.</p>
<h2>Common Pitfalls to Keep in Mind When Completing the Integration Between Azure DevOps and Jira</h2>
<p>When setting up your integration between Jira and Azure DevOps, there are some things to look out for. Being aware of these issues will help keep your teams happy and make your changes successful.</p>
<h3>Role Clarification</h3>
<p>When integrating tools, don’t forget to use them for what they’re good at. Jira is best at issue tracking. Azure DevOps is better for teams using a DevOps toolchain.</p>
<h3>Too Many Messages</h3>
<p>Most platforms send notification messages when certain things happen. This could be when a ticket is created, or when someone leaves a comment. Your integration means this information is shared automatically, which is great. What’s not great is when everybody’s in-tray fills up with unwanted messages. Make sure you tune your notification settings to avoid swamping people with emails.</p>
<h3>Validation Errors</h3>
<p>If you see a validation error when putting your credentials into your Exalate node, try waiting for a while. It may take time for the servers to propagate.</p>
<h2>Architecture, Security, and Deployment for a Jira Azure DevOps Integration</h2>
<p>Alright let’s now discuss Exalate technology in more detail. If you’re using it, you may be curious about its architecture and the security features it has.</p>
<h3>Architectural Autonomy</h3>
<p>This diagram shows Exalate’s architecture:</p>
<p style="clear: both"><img src="https://www.idalko.com/wp-content/uploa ... s-Jira.png" /></p>
<p>The blue end represents Azure DevOps and the red end represents Jira. Exalate agents for each platform sit in between these two services and handle the exchange of information between them.</p>
<p><ul>
<li>The letters A-F show how information flows between platforms. Both services use Exalate as an intermediary, which maintains the autonomy of each one.</li>
</ul>
<ul>
<li>The Exalate agents control what gets sent and how information is matched from one platform to the other.</li>
</ul>
<ul>
<li>As well as Azure DevOps and Jira (Cloud and on-premise), there are Exalate agents available for GitHub, ServiceNow, HP ALM/QC, and Zendesk. More services will be added soon, so check back later if the one you need isn’t ready yet. You can also request an integration.</li>
</ul>
</p>
<h3>Security</h3>
<p>Security is definitely a key consideration when exchanging information between platforms. Exalate is designed with security in mind so you can trust it to synchronize information securely.</p>
<p>It uses the secure https protocol for most data exchange and nodes use a reverse proxy for data termination. It also uses JWT to ensure data requests come from trusted sources.</p>
<p>Exalate protects your data by taking daily backups, which are retained for two days. It also conducts monthly penetration tests to help find and eliminate potential security issues.</p>
<p>To learn more about how Exalate keeps data safe, read this free Exalate Security and Architecture Whitepaper</p>
<p style="clear: both"><img src="https://www.idalko.com/wp-content/uploa ... labels.png" /></p>
<p>This image shows the relationship between Exalate and the services it supports.</p>
<h2>Conclusion</h2>
<p>Using issue trackers and online services is a core part of many businesses, and linking them effectively can be key to ensuring your teams work together efficiently. Being able to join the dots in your organization will save you time and money.</p>
<p>Platforms like Azure DevOps and Jira all have their pros and cons, and working with both of them together can cause headaches. The right software integration solution can let you take advantage of their strengths while dodging the pitfalls that can harm your productivity.</p>
<p>It gives you the reliability of an automated tool, as well as flexibility, letting your teams customize their own workflows. They can work independently, but without the information they store being locked away from other teams. This means you can pick the right platforms for each part of your business, without having to worry about how they connect together. Let the software do the hard work for you.</p>
<p>That’s it for now. In this guide, we’ve set up the integration using Exalate. And we’ve described the step-by-step process on how to complete this integration to bridge the gap between systems, different teams, and companies.</p>
<p>If you’re interested in learning more about software integration, you can download this ebook and read all about an effective cross-company integration. You might also want to find out more about aligning ServiceDesk and development teams in this blueprint.</p>
<p><strong><em>Recommended reads:</em></strong></p>
<p><strong>SUBSCRIBE TO OUR NEWSLETTER</strong></p>
<h2>Devops integration</h2>
<h3>Devops integration</h3>
<p>[youtube]</p>
Devops integration <a href="http://remmont.com">Latest news headlines</a> Devops integration
<h4>Devops integration</h4>
The Blog Manoosh March 31, 2020 Uncategorized Many companies seek the right software integration solution to sync data in a flexible manner in order to seamlessly collaborate with one
<h5>Devops integration</h5>
Devops integration <a href="http://remmont.com">Devops integration</a> Devops integration
SOURCE: <h6>Devops integration</h6> <a href="https://dev-ops.engineer/">Devops integration</a> Devops integration
#tags#[replace: -,-Devops integration] Devops integration#tags#
Eduard Kabrinskiy
current news

